In TaxMingle, both CPAs and Clients can easily manage their account information through the Profile Settings section. This includes updating your name, email, and phone number.
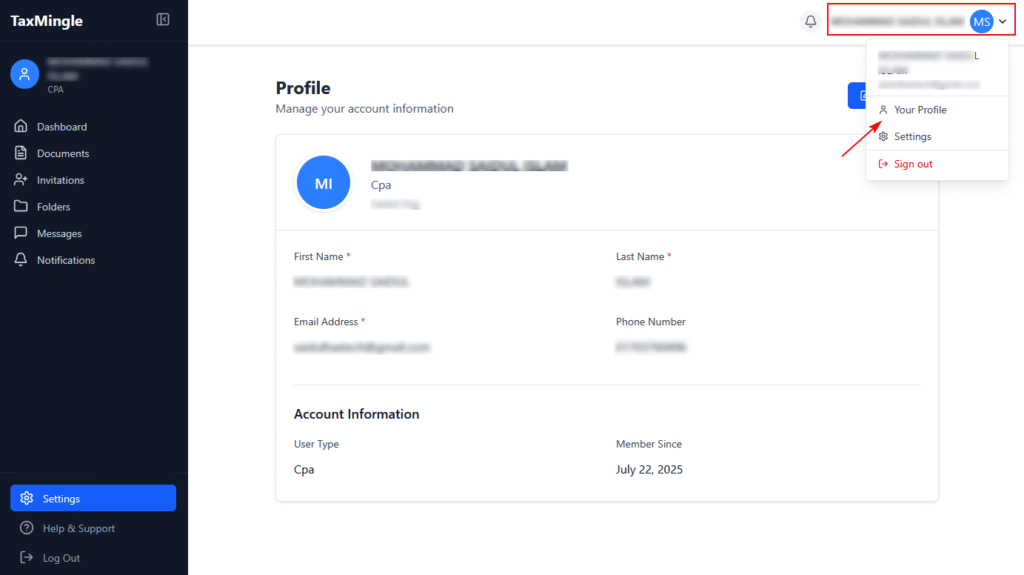
Step 1: Access Your Profile
From the top-right corner of the dashboard, click on your name or avatar.
In the dropdown menu, select Your Profile.
This will open the Profile page where you can view and manage your account details.
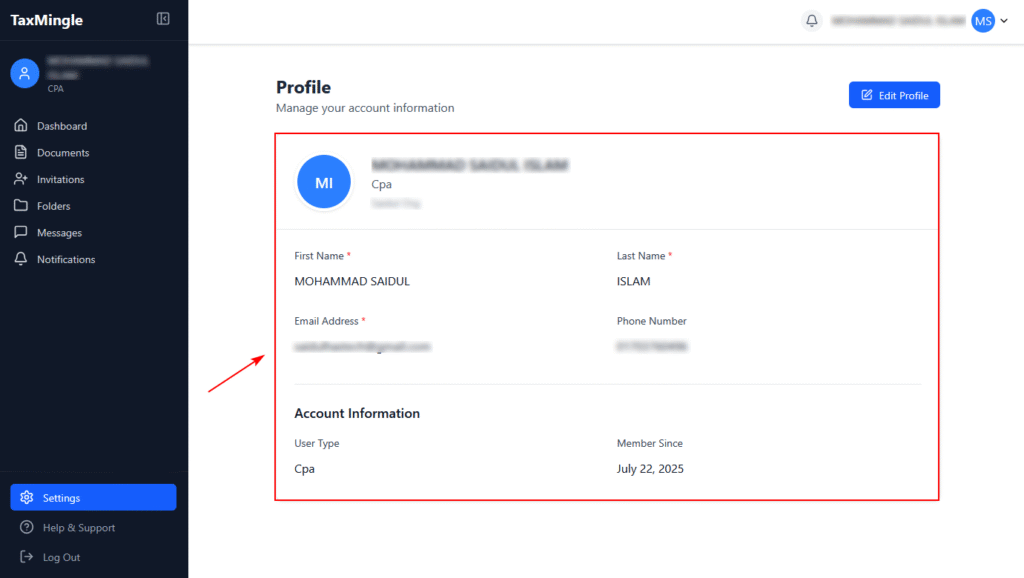
Step 2: View Your Account Information
On the Profile page, you’ll see your:
First Name
Last Name
Email Address
Phone Number
User Type (e.g., CPA or Client)
Organization Name (for CPAs)
Member Since (account creation date)
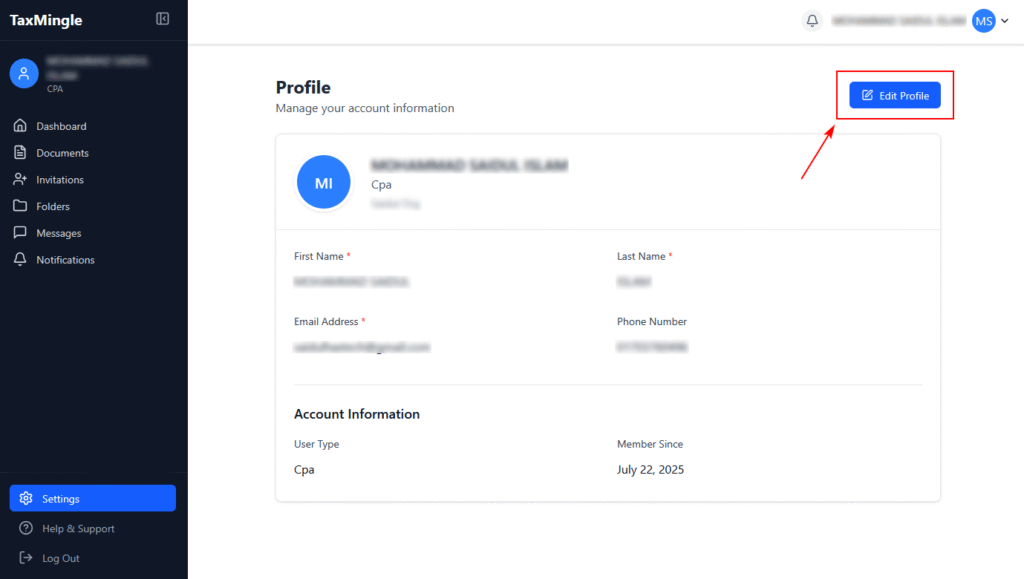
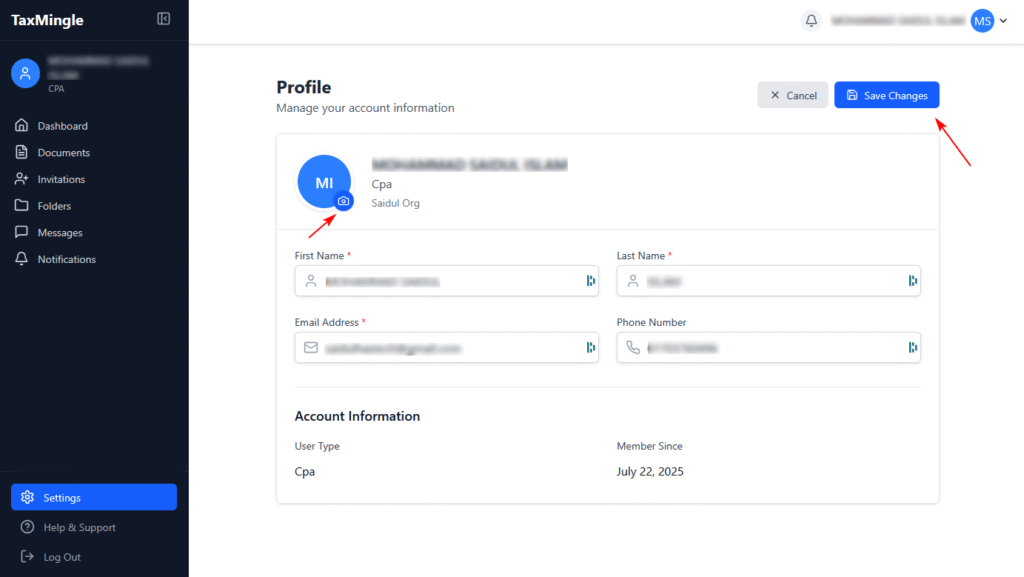
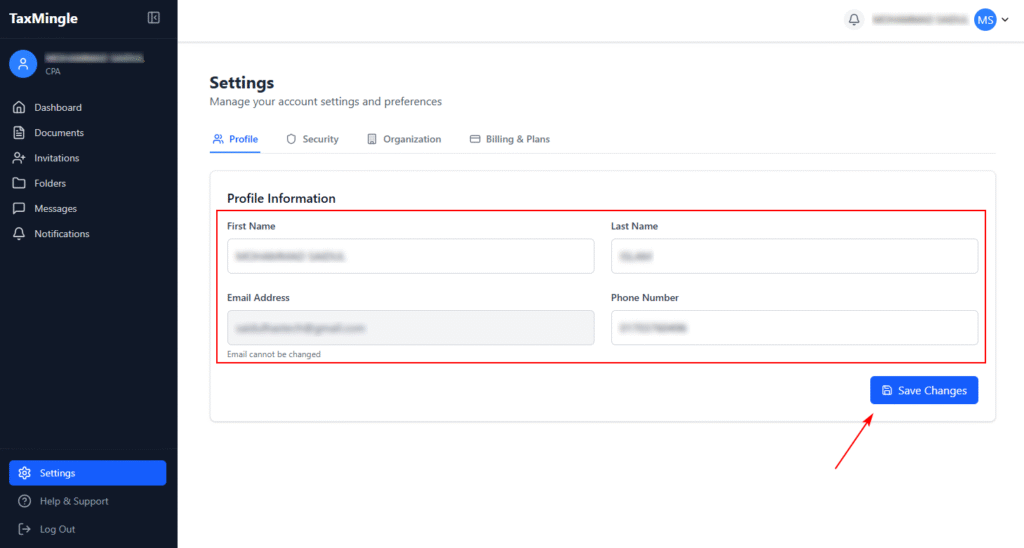
Step 3: Edit Your Profile
Click the Edit Profile button on the top right of the Profile section.
Update the fields you want to change (e.g., name, phone, email).
Once done, click Save Changes to apply the updates.
You can also update your profile picture by clicking on the avatar icon.
In TaxMingle, the Settings section allows CPAs to manage personal account details, update security preferences, configure organization-level settings, and view or update billing plans — all from one central location.
1. Accessing the Settings
To begin, click Settings in the left-hand sidebar of your TaxMingle dashboard. This will take you to a page with four main tabs:
Profile
Security
Organization
Billing & Plans
Each of these sections is explained below.
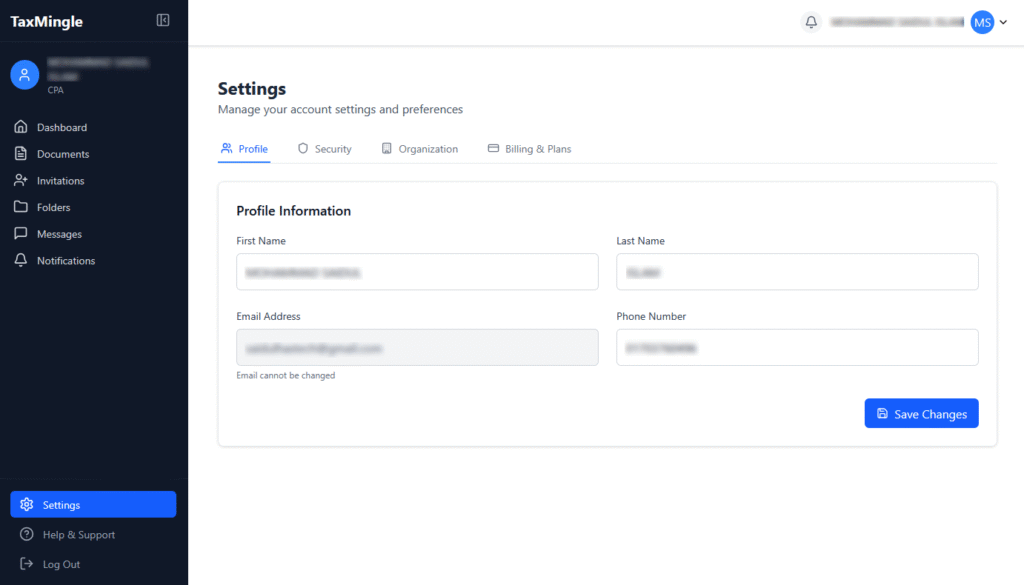
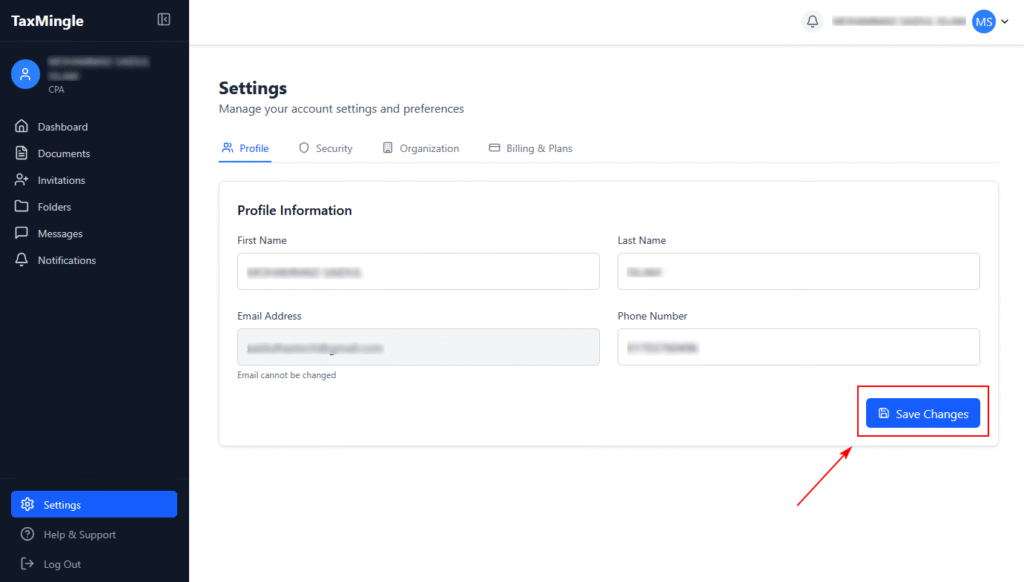
2. Profile Settings
In the Profile tab, you can:
Update your full name
Set or update your phone number
Once changes are made, click the Save Changes button to apply updates.
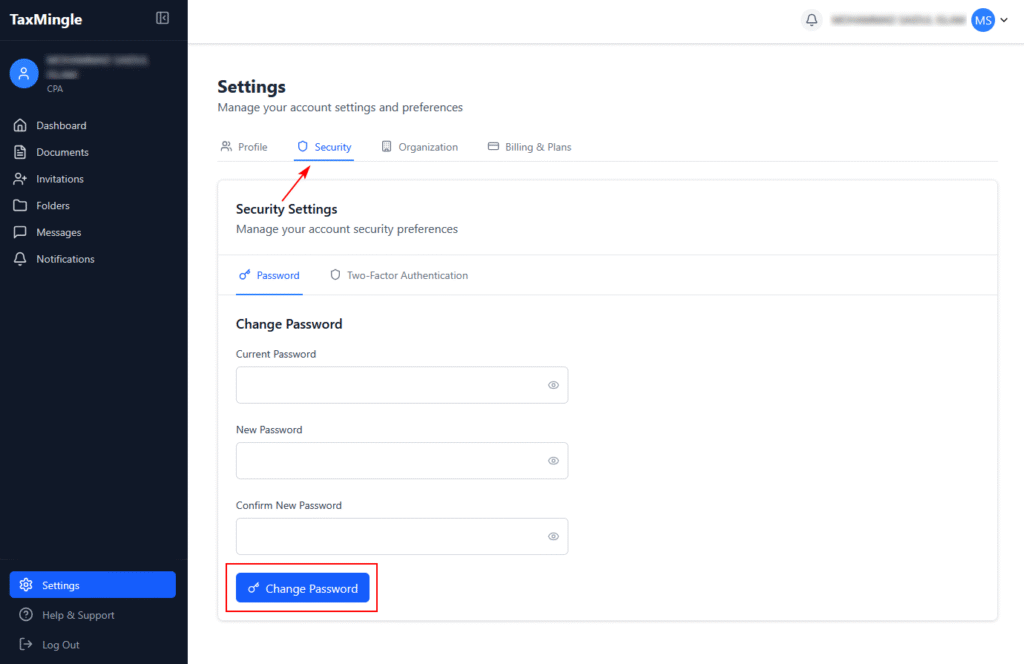
3. Security Settings
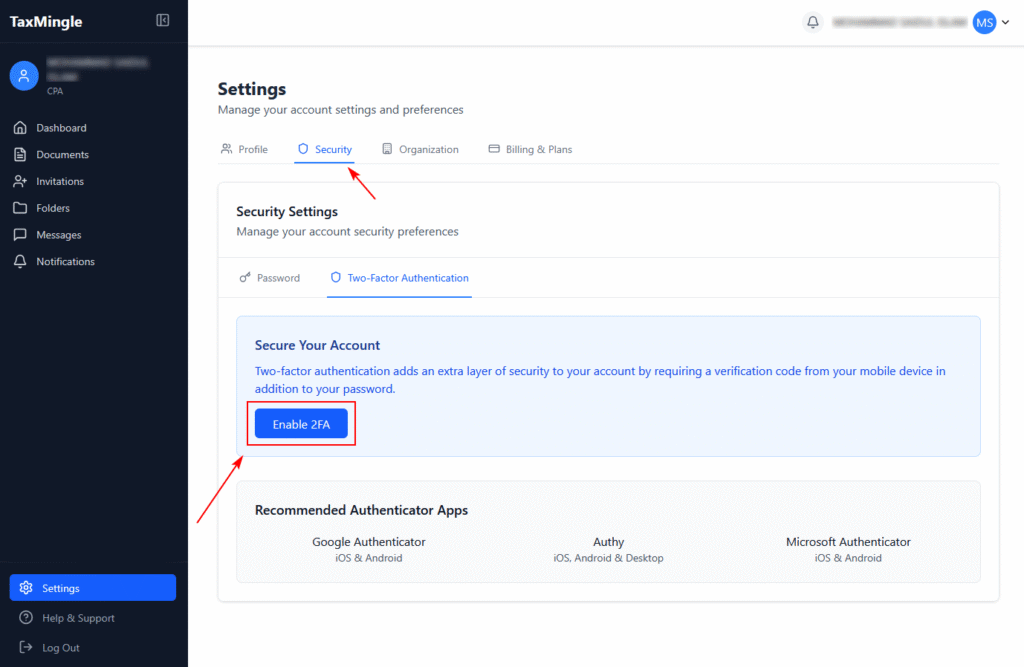
The Security tab helps protect your account. Here you can:
Change your password: Enter your current and new password to update.
Enable Two-Factor Authentication (2FA): Click the toggle to activate 2FA for added security. You’ll be prompted to scan a QR code using an authenticator app like Google Authenticator or Authy.
🛡️ We strongly recommend enabling 2FA to protect sensitive financial data.
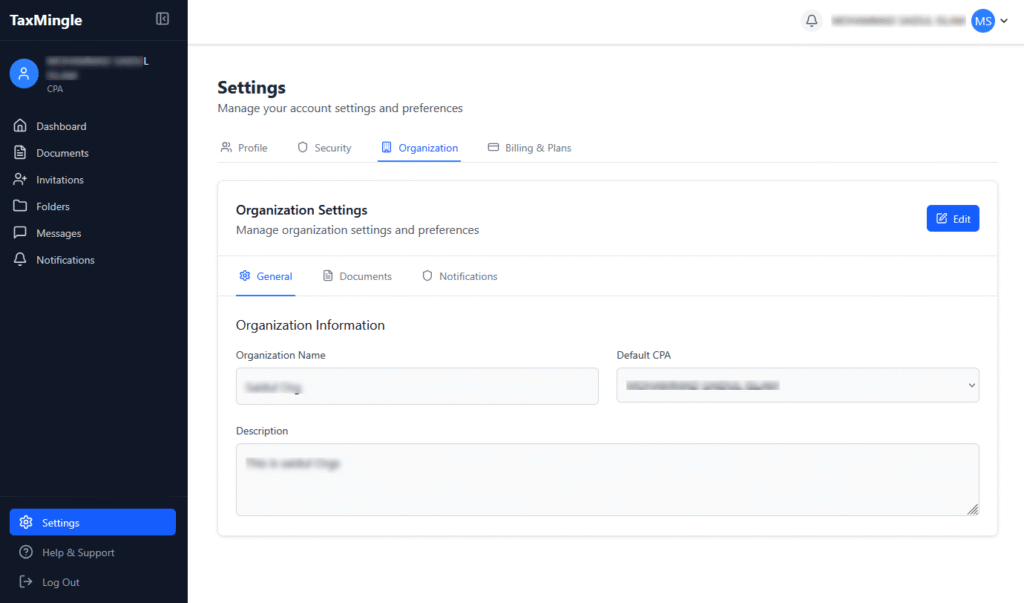
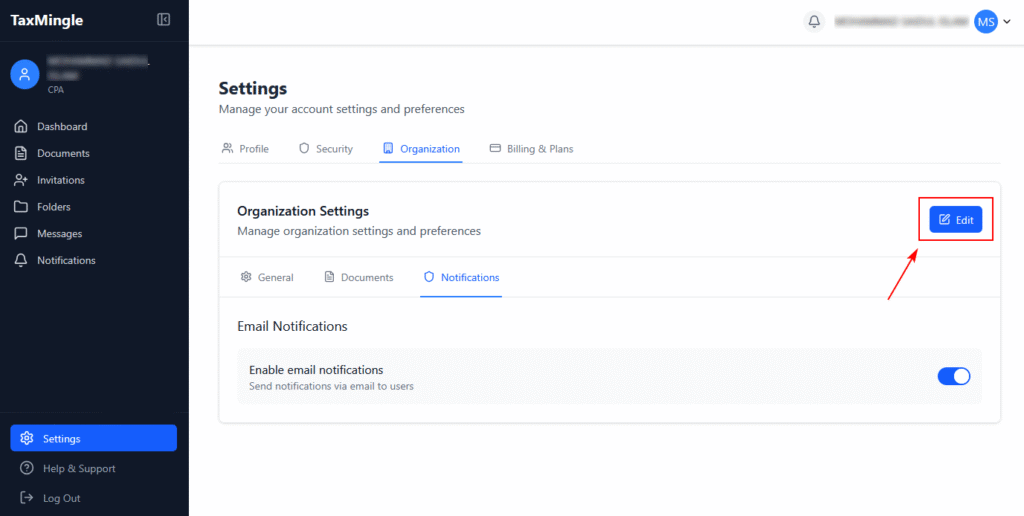
4. Organization Settings
The Organization tab is where you manage organization-level controls and team preferences.
It contains three subtabs:
A. General Settings
Update your organization name, company and basic business info.
B. Document Permissions (Subtab: Documents)
Here you can configure how clients interact with uploaded documents:
Allow clients to edit their own documents Clients can modify the documents they uploaded.
Allow clients to delete their own documents Clients can permanently delete their own uploads.
Require approval for client uploads CPA/Admin must approve documents before they’re processed.
File Settings Maximum File Size (MB): Set the max upload limit (e.g., 50MB).
Allowed File Types: Check/uncheck extensions such as .pdf, .docx, .xlsx, .jpg, .jpeg, .png, .txt, and .csv.
Use the Edit button to make changes, and click Save to confirm.
C. Email Notifications (Subtab: Notifications)
Enable Email Notifications: Toggle on to send activity alerts and updates via email to your team or clients.
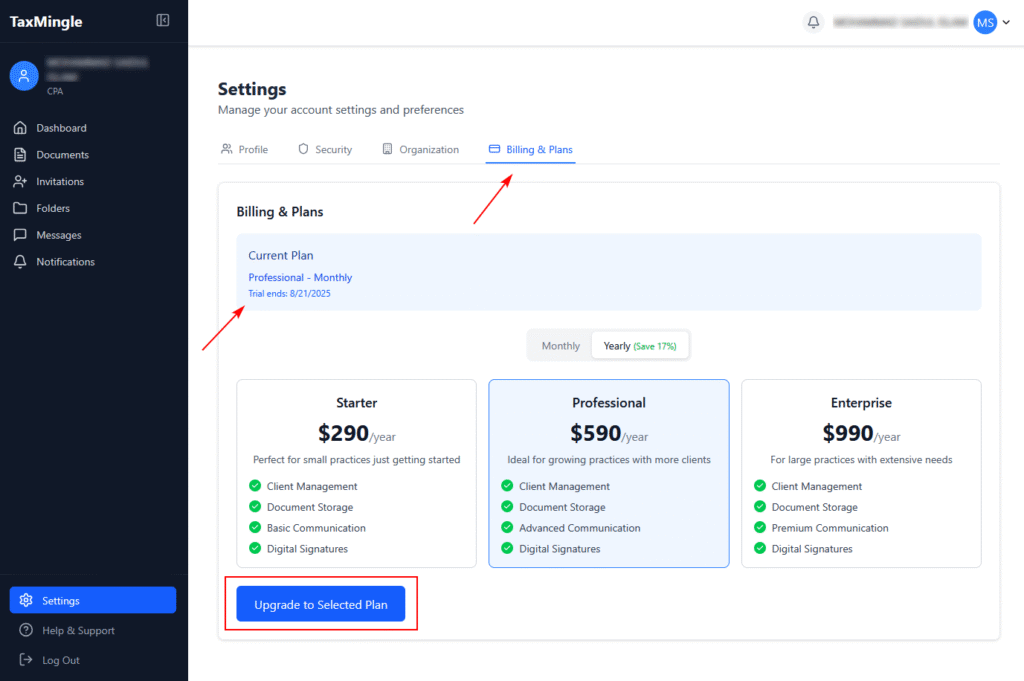
5. Billing & Plans
Under Billing & Plans, you can:
View your current subscription plan (e.g., Monthly or Yearly)
See your plan’s features and limits
Switch plans or upgrade if needed
To change your plan, simply click the Change Plan or Upgrade button and follow the prompts.
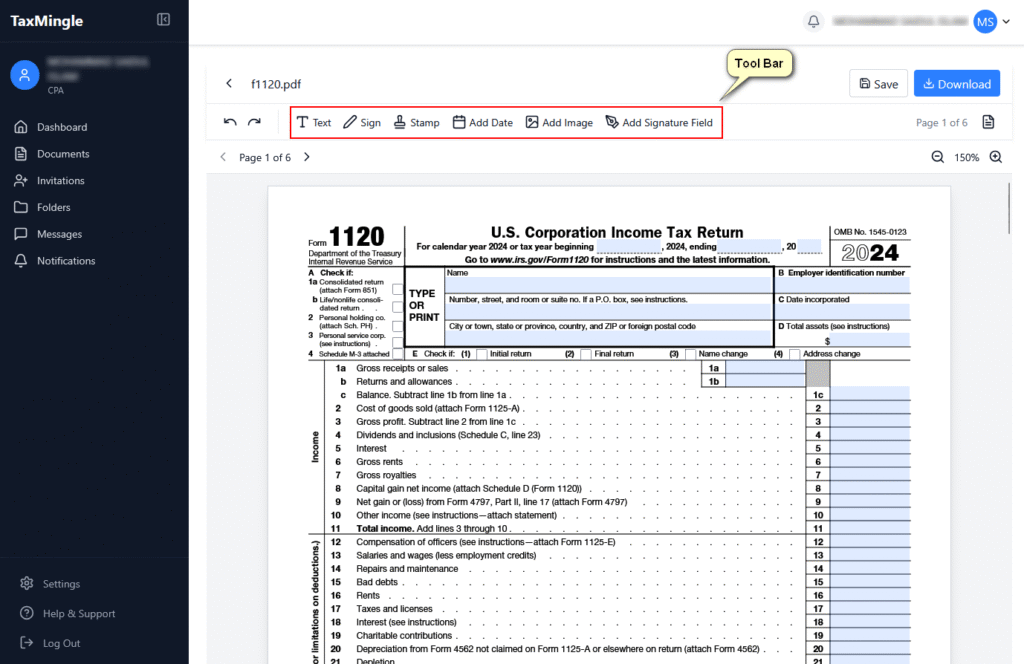
Add Text, Sign, Insert Stamp, Add Date, Upload Image, and Add Signature Field
The built-in PDF editing tools in TaxMingle allow CPAs to prepare documents quickly and professionally — all without leaving the platform. This guide walks you through how to use each available tool in the document toolbar.
Open the PDF Editor:
From your Dashboard, go to the left-hand Documents tab. This page displays all uploaded tax documents. Find the document you wish to edit (e.g., f1120.pdf), then look to the Actions column on the right.
Click the PDF Editor icon (orange icon with a document and pencil) as shown in the screenshot. This will open the file in the built-in PDF Editor where you can start making annotations like text, signatures, stamps, and more.
Where to Find the PDF Toolbar
After opening any document (e.g., a tax form like Form 1120), you’ll see the PDF editing toolbar at the top of the viewer. This contains the following tools:
Text
Sign
Stamp
Add Date
Add Image
Add Signature Field
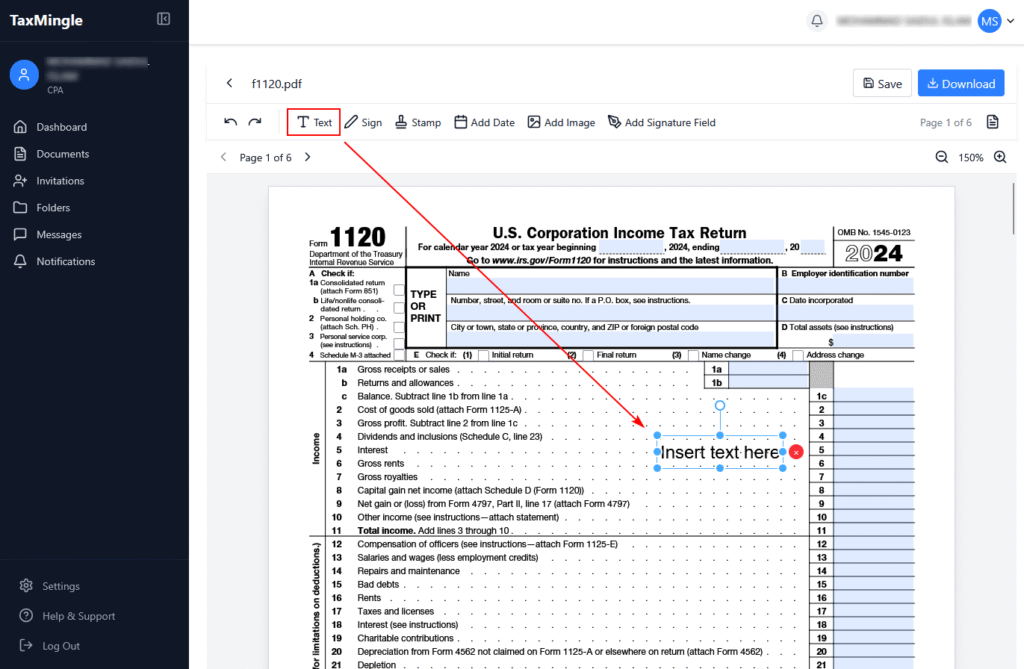
1. How to Add Text
Use the Text tool to insert comments, explanations, or fill out blank fields.
Steps:
Click the Text icon on the toolbar.
Click anywhere on the PDF where you want to add text.
Type your content directly into the field.
Drag to reposition or click the text to adjust size, font, or color.
2. How to Add a Signature
You can insert your own digital signature directly into a document.
Steps:
Click the Sign icon.
Choose or create your signature using one of the available options:
Draw your signature.
Type your name and select a font.
Upload an image of your signature.
Click Create to place the signature.
Drag to position it accurately on the document.
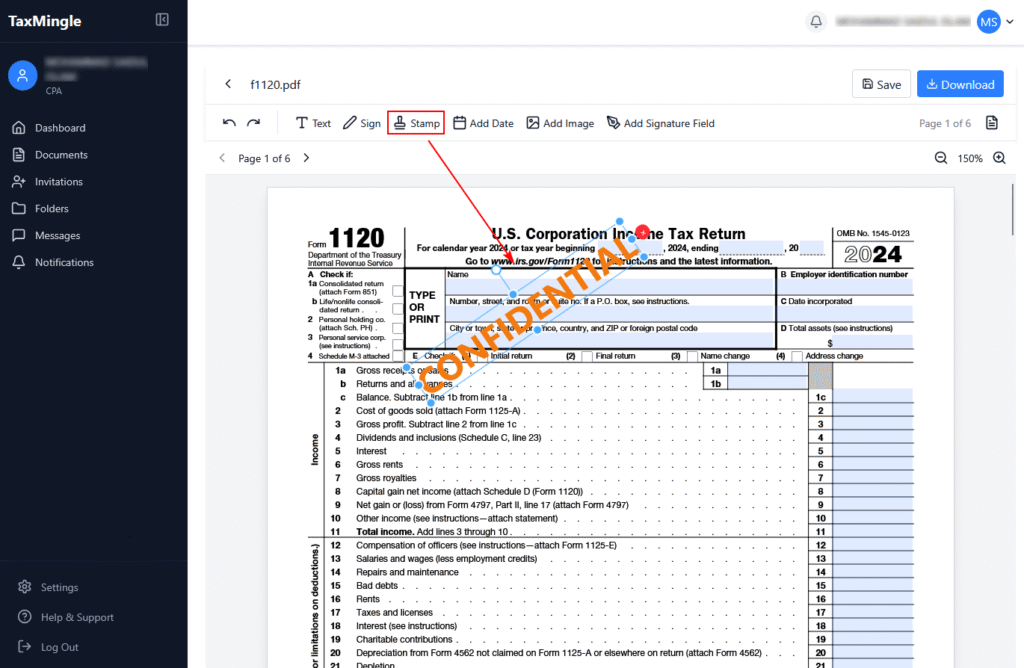
3. How to Add a Stamp
Use stamps like “Approved,” “Draft,” or “Rejected” to quickly label documents.
Steps:
Click the Stamp icon.
Choose from pre-defined stamps or upload your own image (JPG/PNG).
Click the location where the stamp should appear.
Drag to reposition or resize as needed.
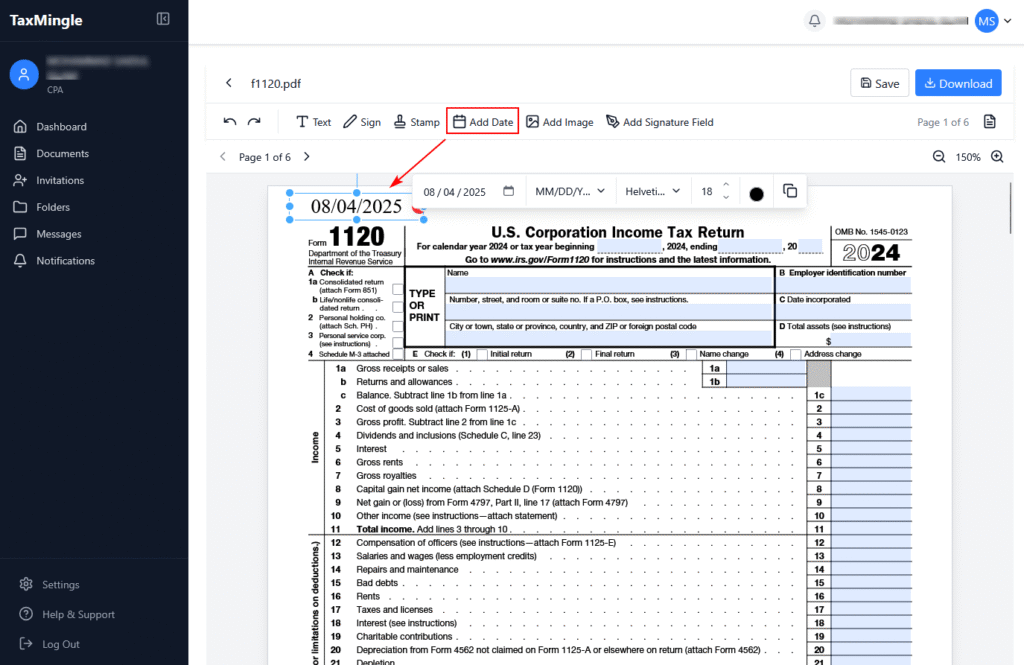
4. How to Add a Date
Insert today’s date or choose a custom one with various formatting options.
Steps:
Click the Add Date icon.
Click the area on the PDF where the date should appear.
A small input box will appear — select your preferred:
Date format (MM/DD/YYYY, DD-MM-YYYY, etc.)
Font style, size, and color
Confirm to place the formatted date.
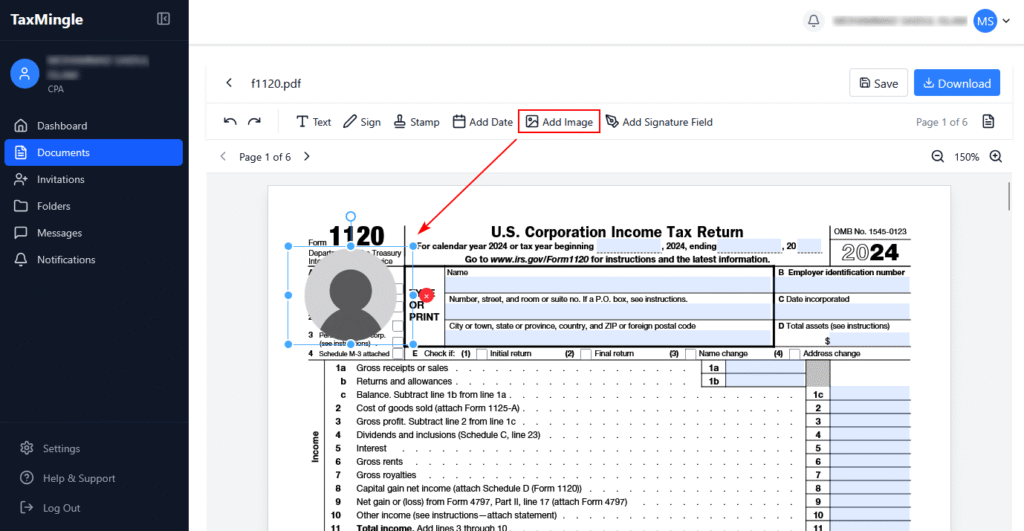
5. How to Add an Image
Insert supporting visuals, scanned pages, or logos directly into your PDF.
Steps:
Click the Add Image icon.
Upload the image file from your computer.
Click on the document to place the image.
Resize and reposition the image as needed.
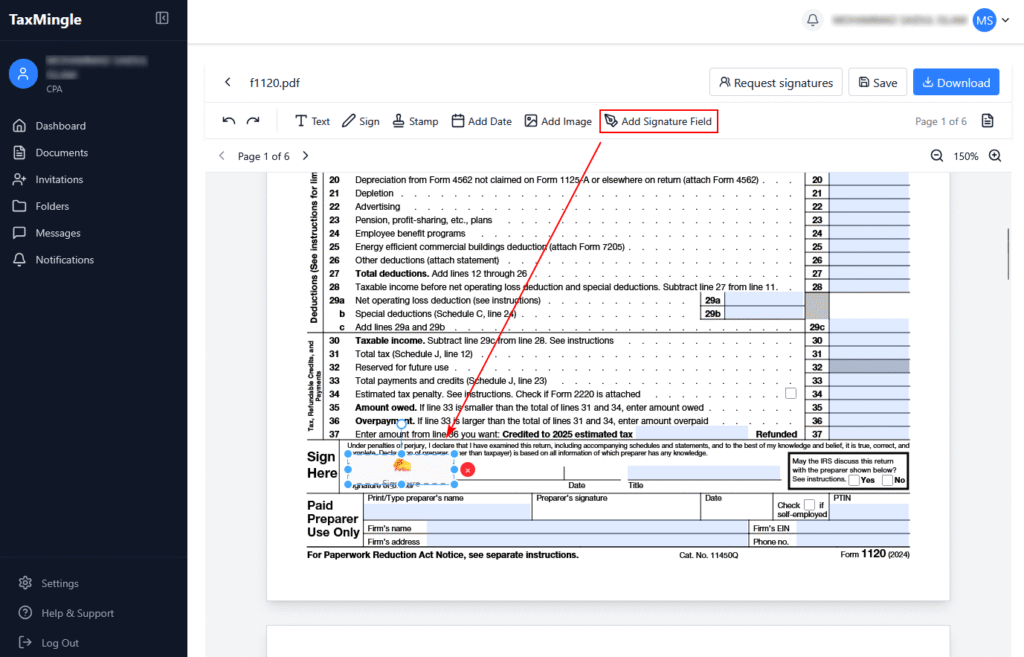
6. How to Add a Signature Field
This allows you to designate where a client should sign the document.
Steps:
Click the Add Signature Field icon.
Click the document area where the client’s signature is required.
A placeholder will appear labeled “Sign Here”.
You can assign this field to a specific client when requesting a signature.
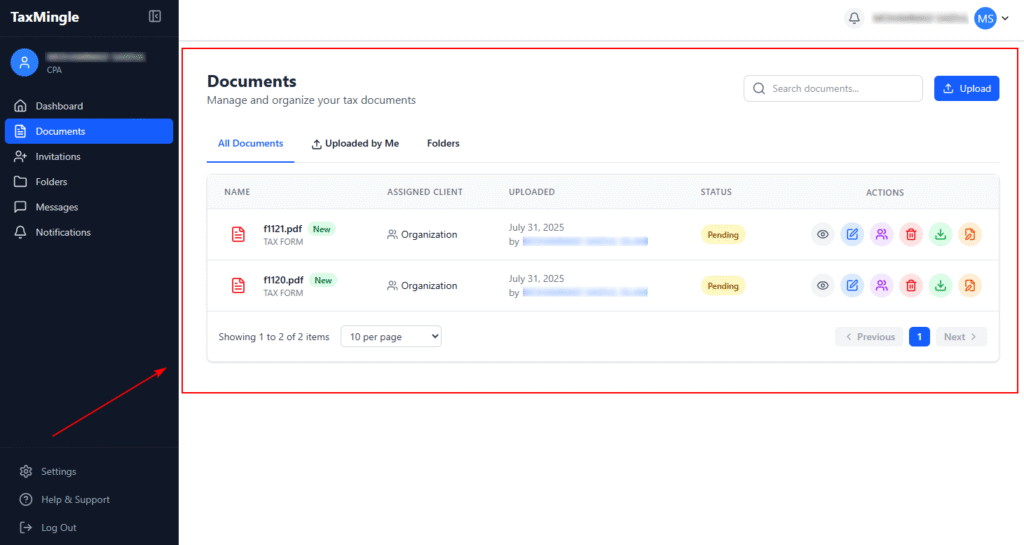
This guide will help you upload tax documents, assign them to clients, and organize them into folders for better document management in TaxMingle.
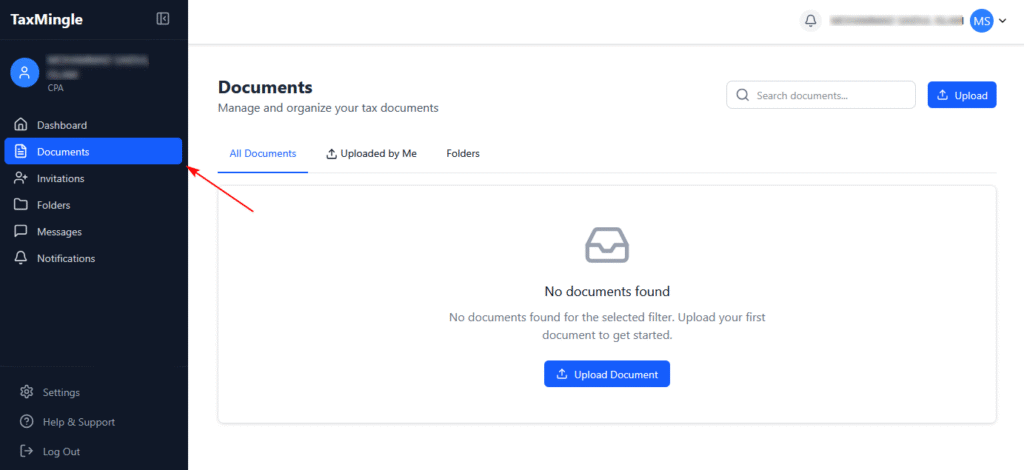
Step 1: Navigate to the Documents Tab
From the left sidebar, click on Documents.
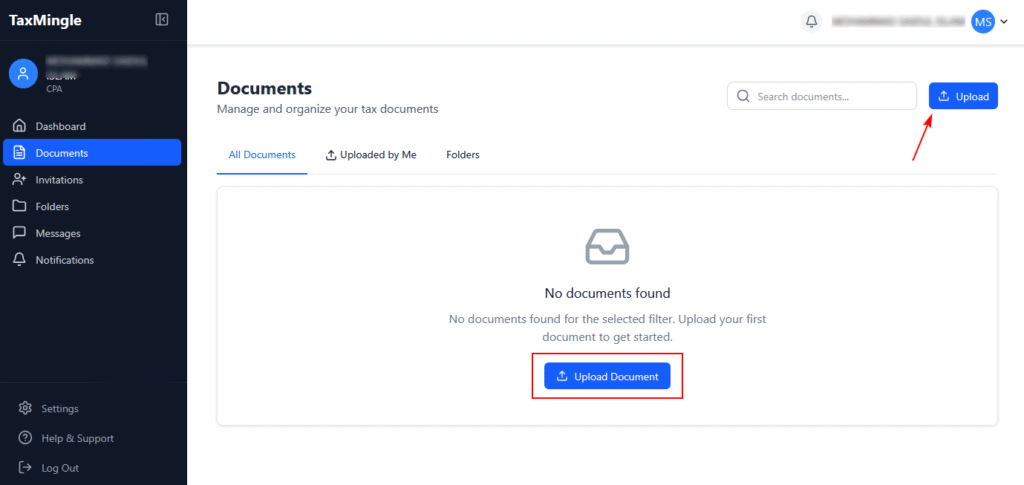
Step 2: Click the Upload Button
Click the Upload button at the top right or the Upload Document button in the center if no documents exist yet.
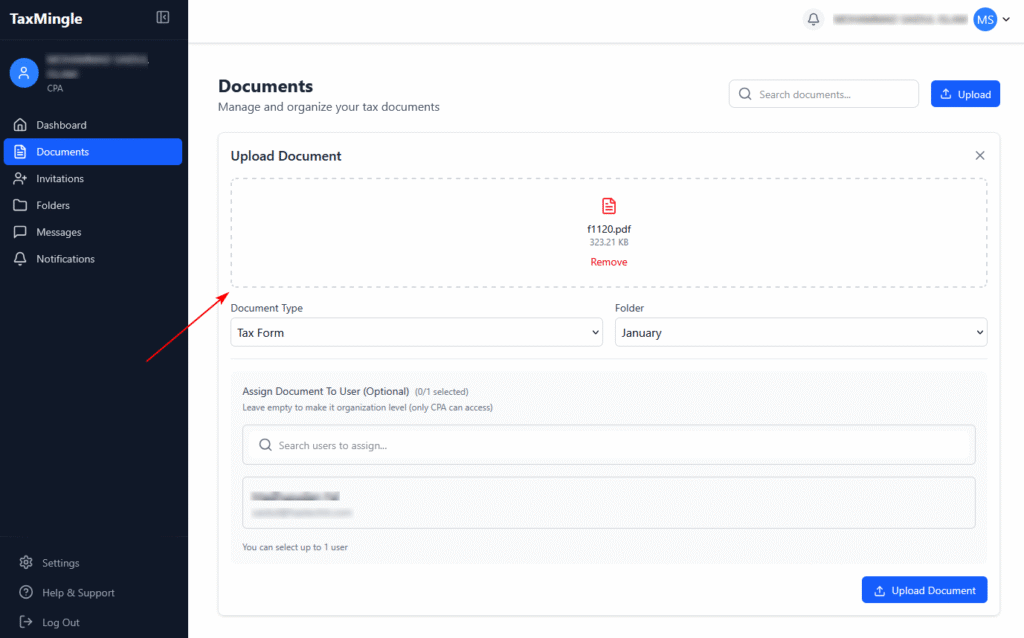
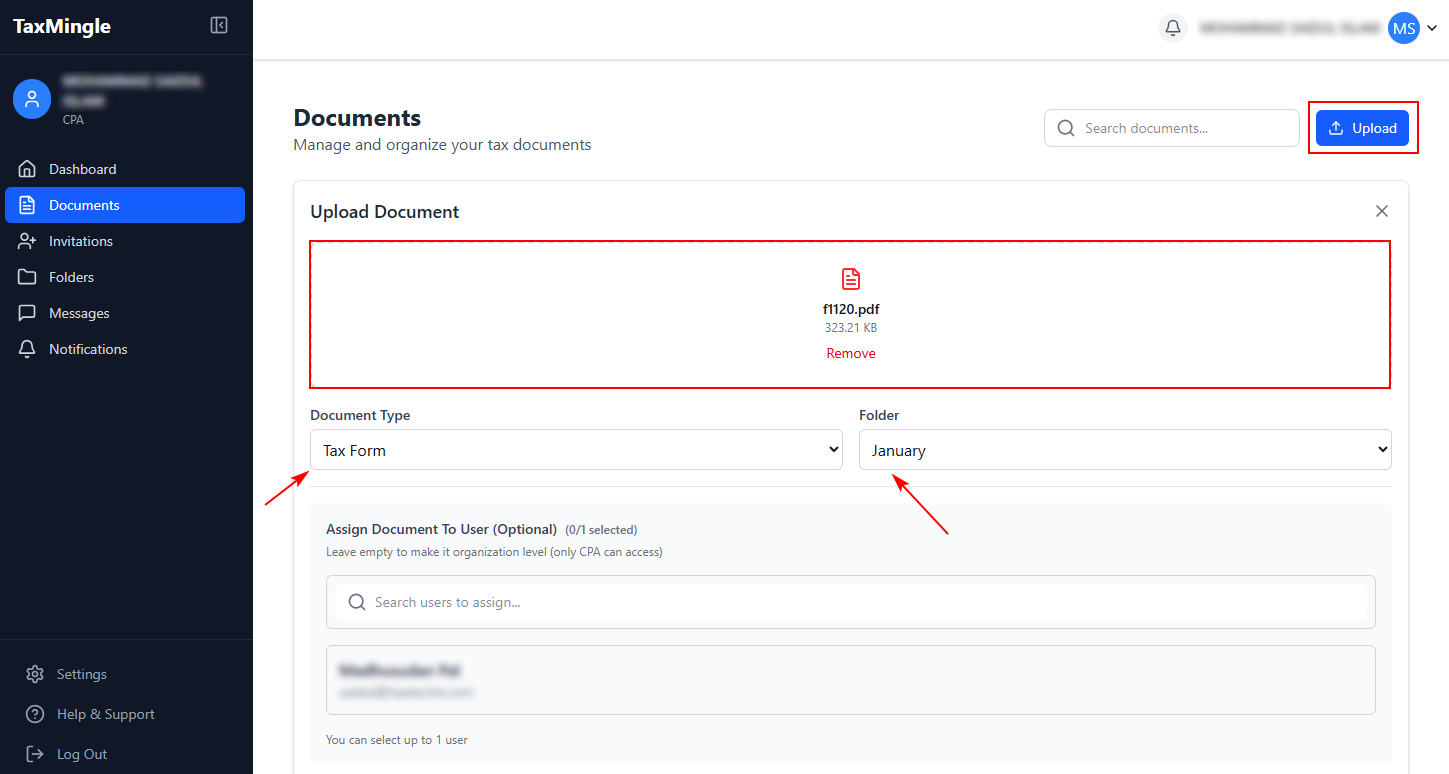
Step 3: Upload Your File
You can drag and drop a file or click to browse and upload it. Supported formats: PDF, JPG, JPEG, PNG.
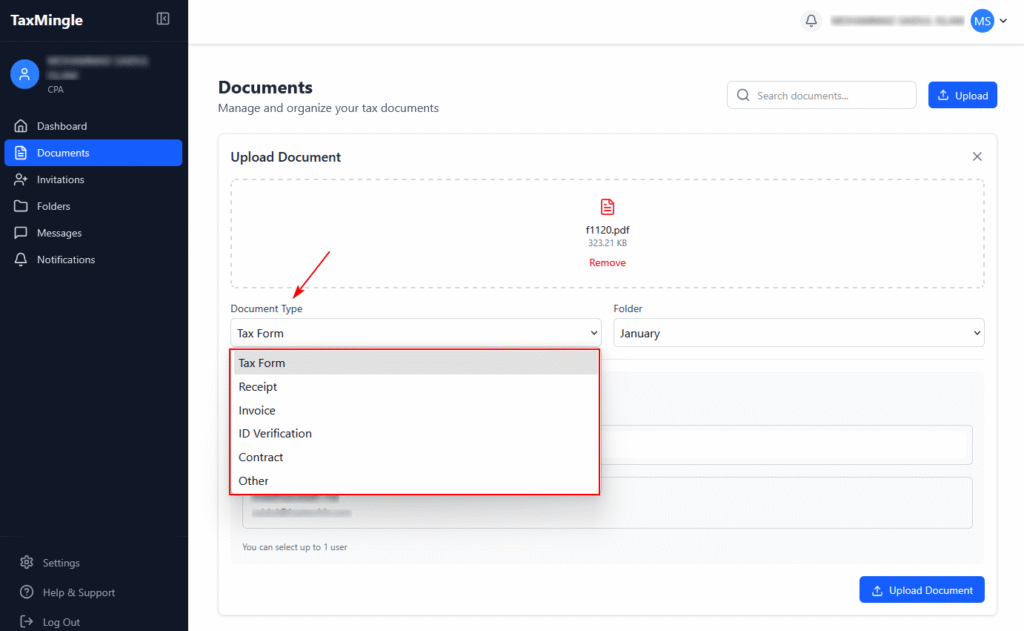
Step 4: Choose a Document Type
From the dropdown labeled Document Type, choose the appropriate category for your file (e.g., Tax Form, Invoice, Receipt, etc.).
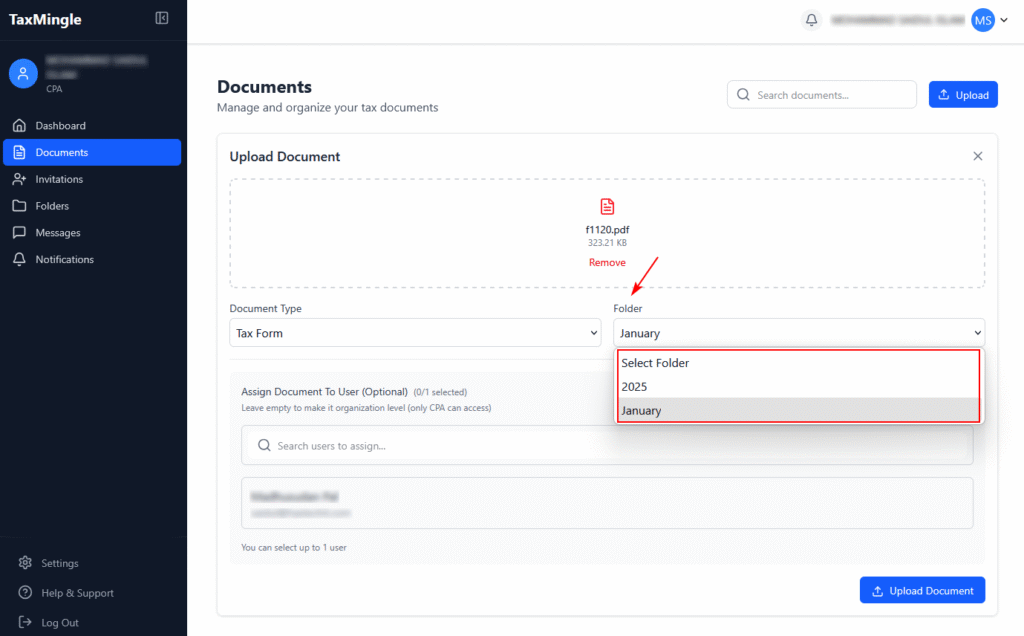
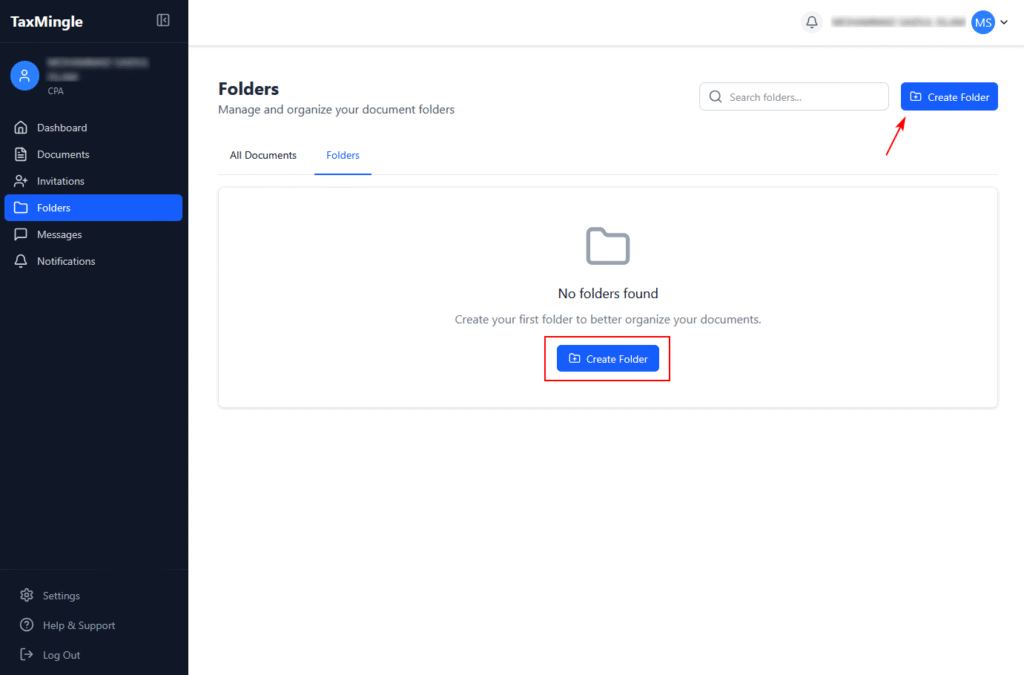
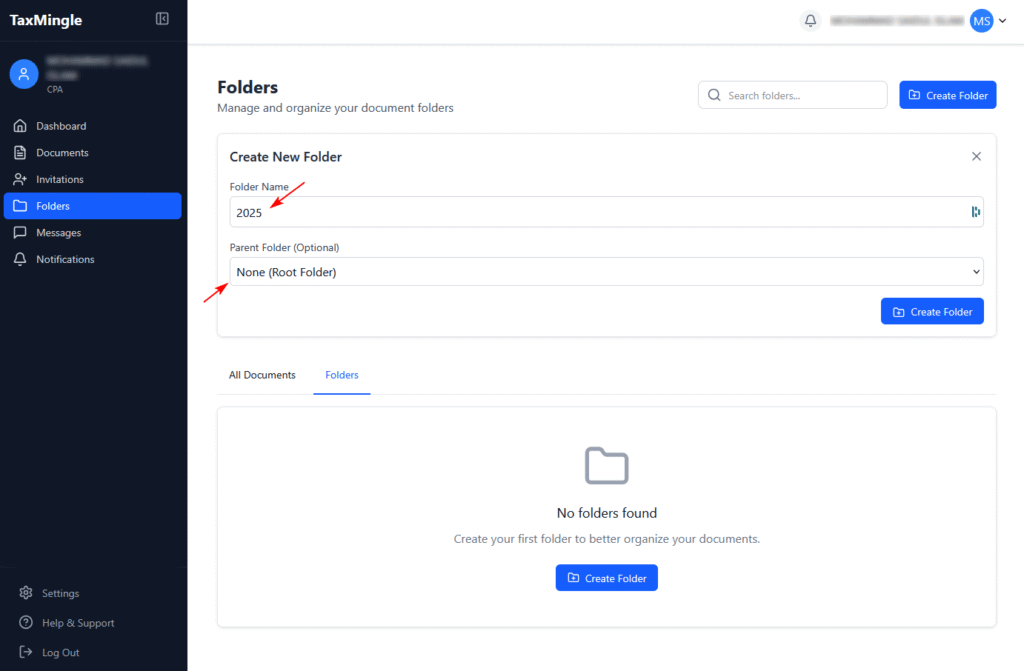
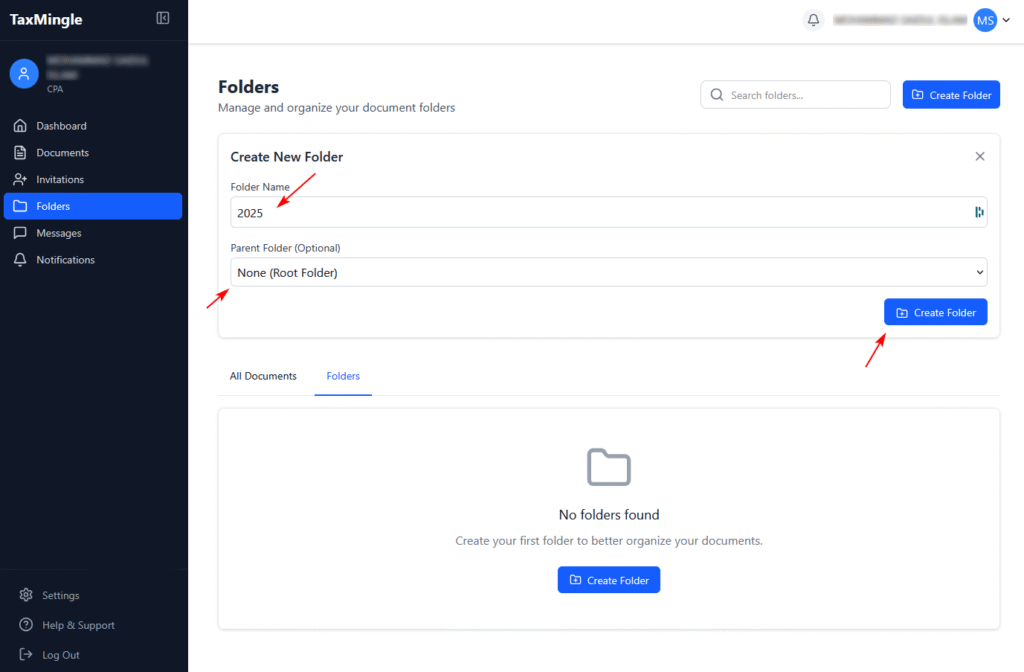
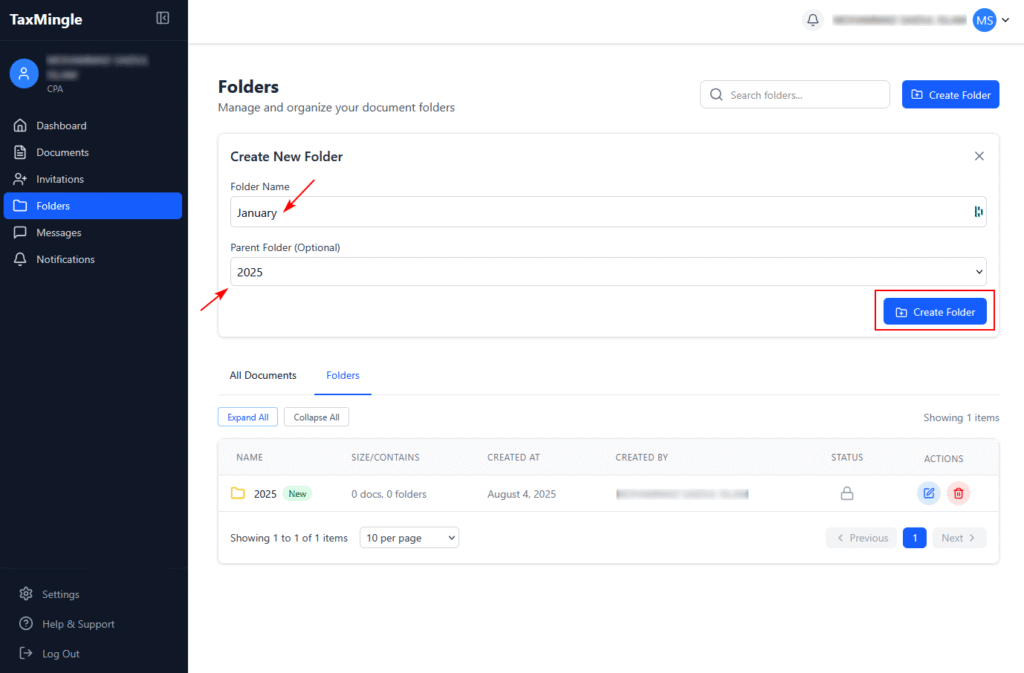
Step 5: Select or Create a Folder
Choose the folder where the document will be stored. If folders like “2025” or “January” already exist, you can select them.
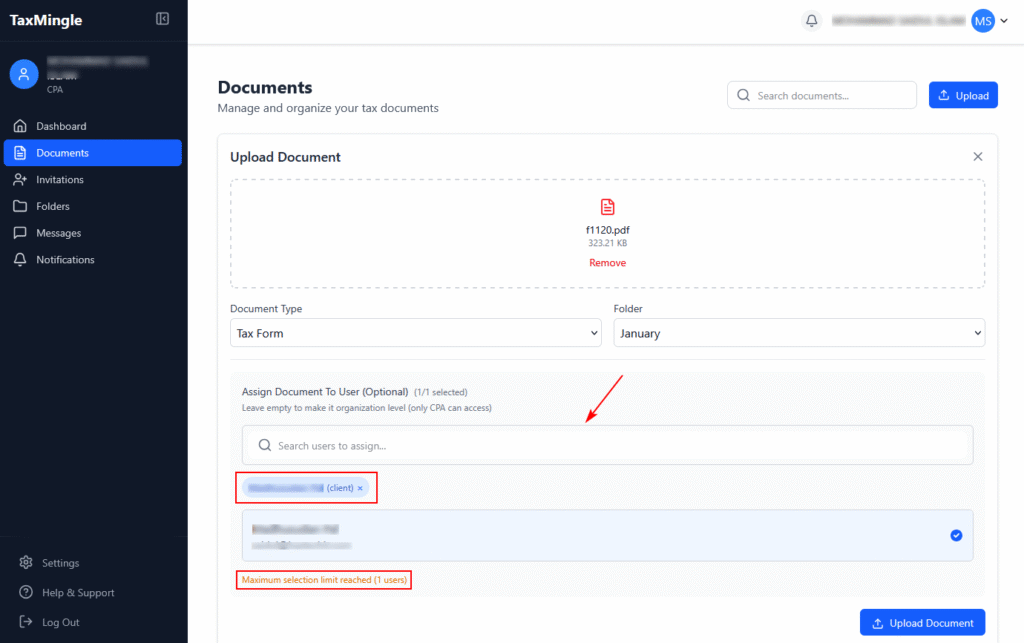
Step 6: Assign the Document to a Client (Optional)
Use the search bar under Assign Document To User (Optional) to find and select the client the document belongs to. You can assign it to one client only. Leave this empty if the document is for internal (organization-level) use.
Step 7: Upload the Document
Once everything is set, click the Upload Document button at the bottom right to complete the upload.
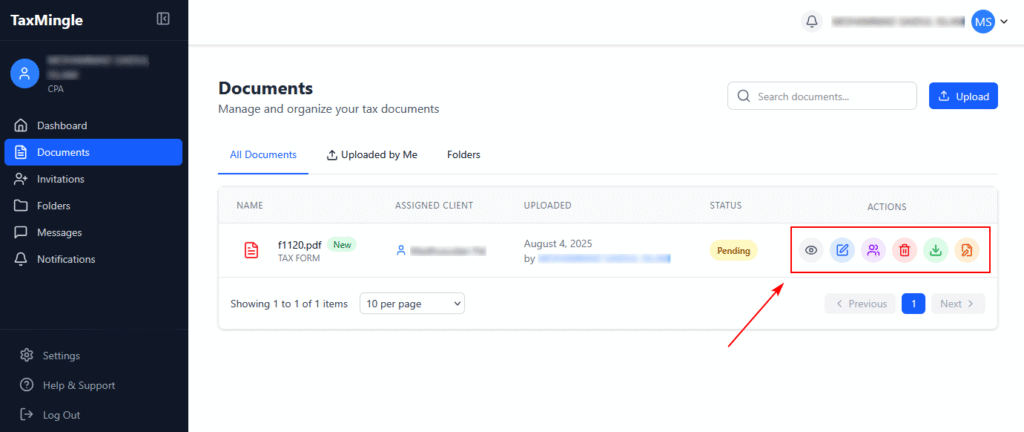
Step 8: View and Manage Uploaded Documents
After uploading, your document will appear in the list with the assigned client, status (e.g., Pending), and several action buttons:
TaxMingle makes it easy for CPAs to expand their workspace by inviting both clients and teammates (such as other CPAs or staff) to join their organization. Each invited user receives a secure registration link and gets linked to your account for smooth collaboration.
Follow the steps below to send invitations using the Invitations feature:
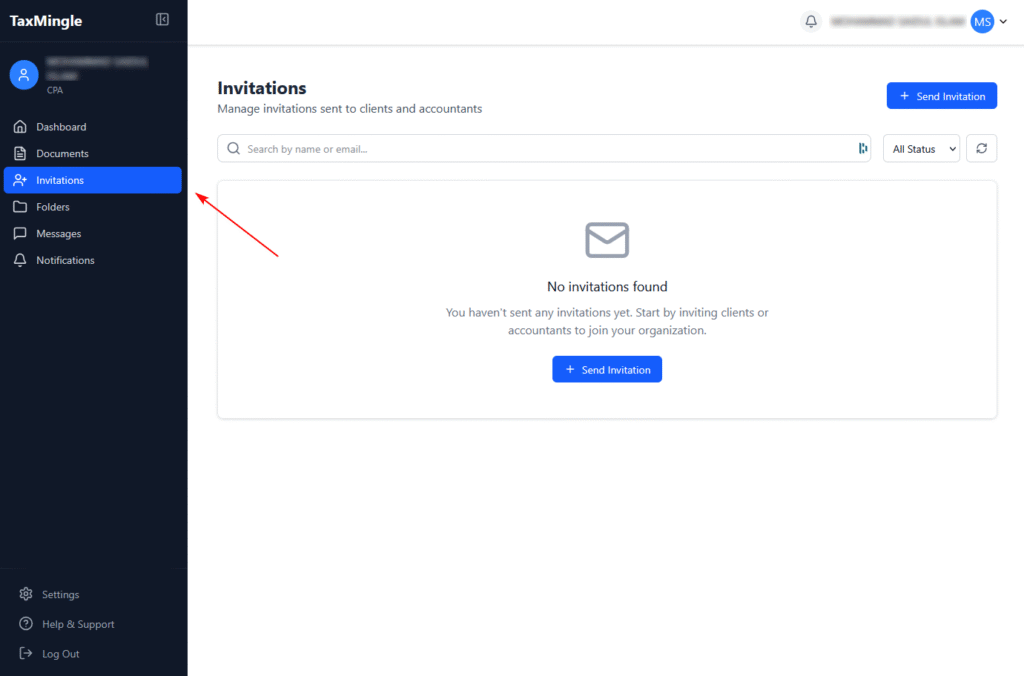
Step 1: Navigate to the “Invitations” Tab
Sidebar → Invitations
From your dashboard, locate the left-hand sidebar and click on “Invitations.” This section allows you to invite both clients and teammates (other CPAs or staff) to your TaxMingle organization.
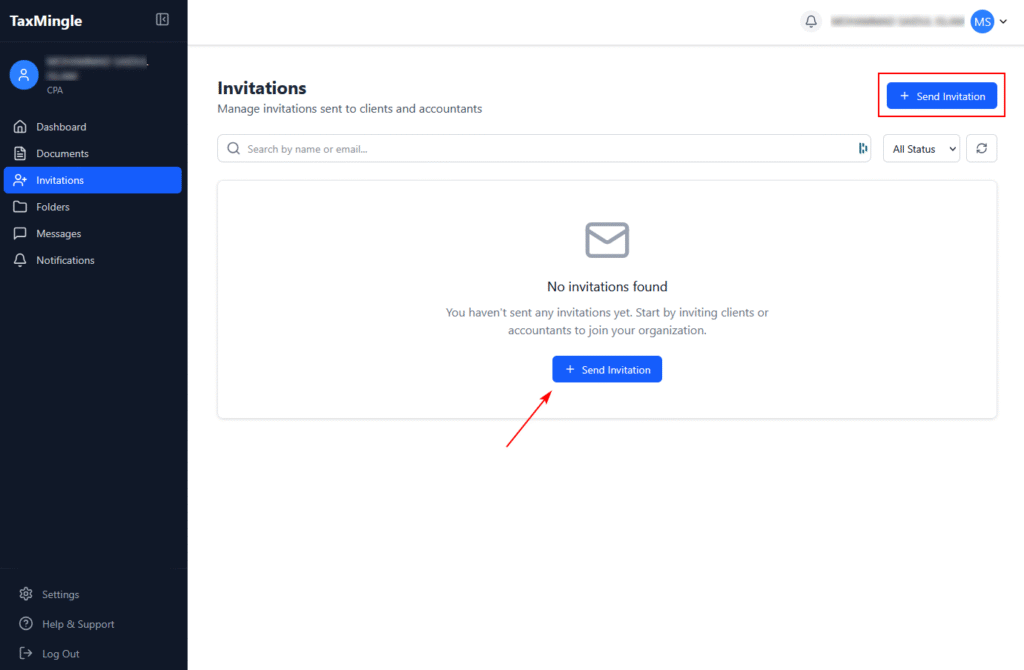
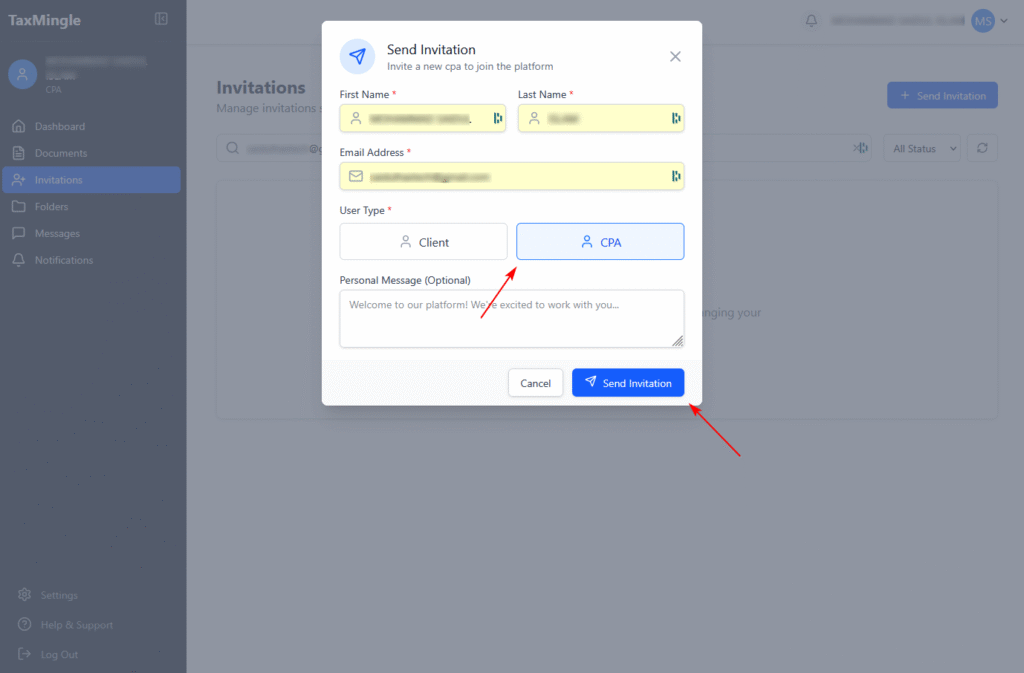
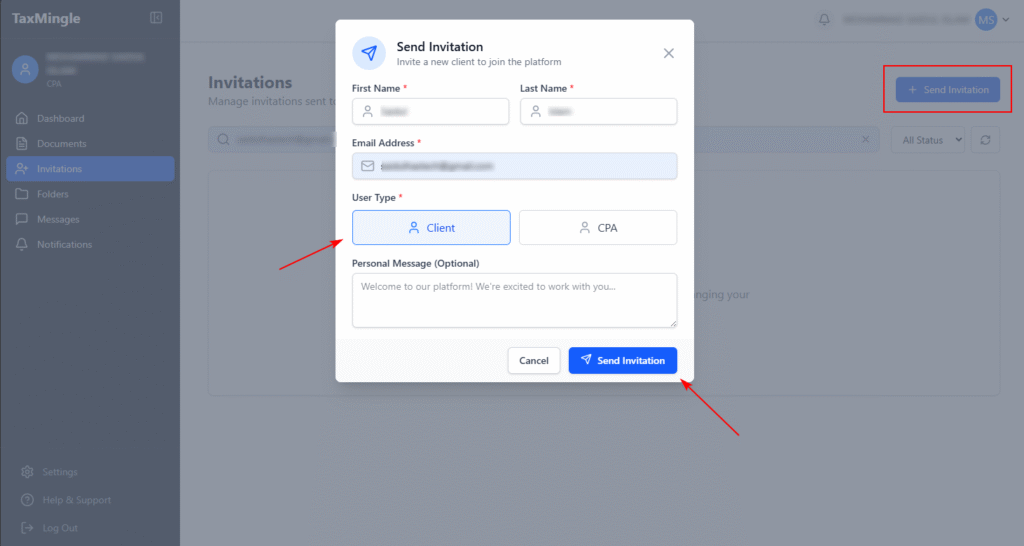
Step 2: Click “Send Invitation”
At the top-right corner, click the “Send Invitation” button. A pop-up form will appear where you can enter your client’s or teammates (other CPAs or staff) details.
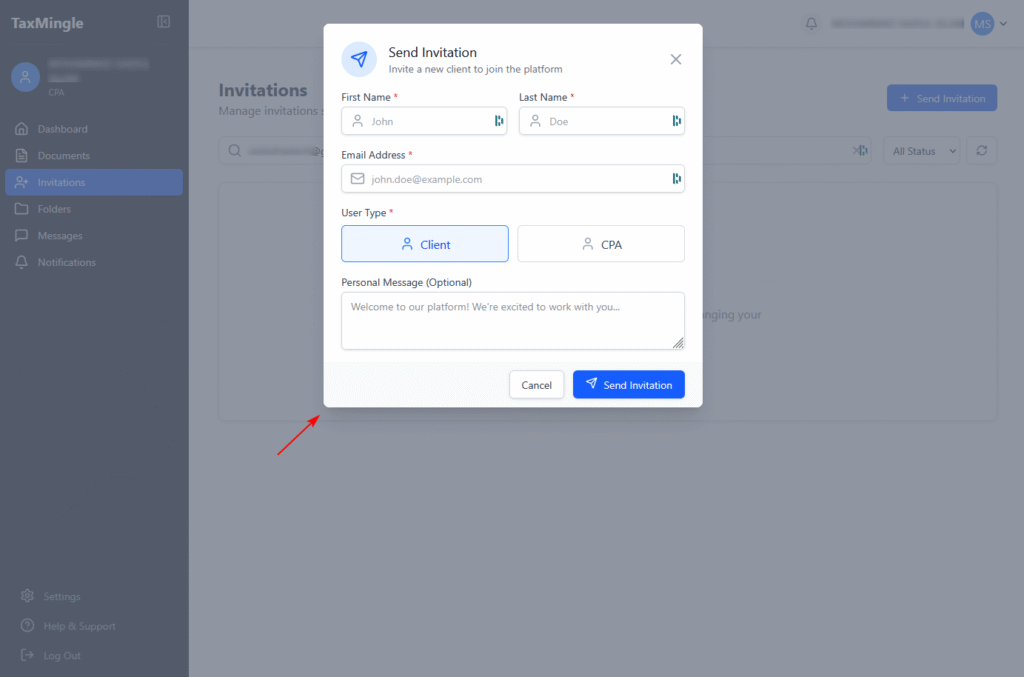
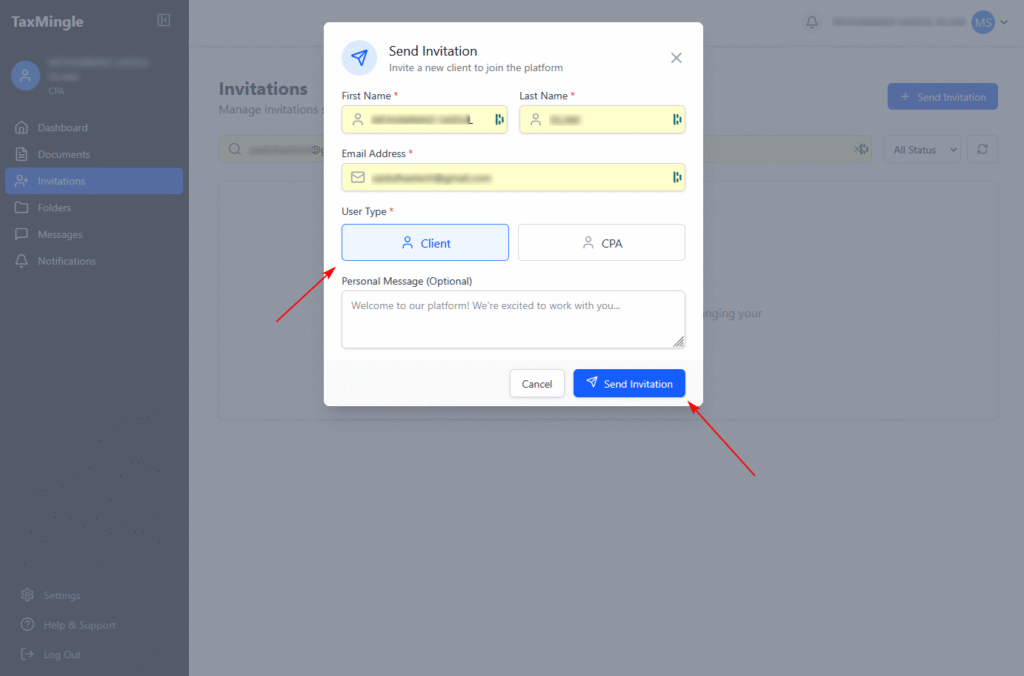
Step 3: Fill in Client or CPAs Information
In the form, provide the following required information:
Client Name – Enter the full name of the client
Email Address – Enter a valid email the client uses
(Optional): Add notes
Once complete, click “Send Invitation.”
CPA Name – Enter the full name of the CPA
Email Address – Enter a valid email the CPA uses
(Optional): Add notes
Once complete, click “Send Invitation.”
Step 4: Invitation Email Sent
The client will receive an email from TaxMingle with a unique registration link.
Once they click the link, they’ll be guided to complete their profile and create a password
After registration, they’ll be automatically linked to your CPA workspace
You’ll be able to immediately share documents and assign files
Track Pending or Accepted Invitations
Back on the Invitations tab, you can:
View invitation status (Pending, Accepted, Expired,cancelled)
Resend or cancel invitations as needed
Sort and manage client invites by status
Tips for a Smooth Invitation Process
Double-check the client’s email before sending
If the client hasn’t received the email, ask them to check their Spam or Promotions folder
You can resend the invite at any time from the Invitations tab
Once you’ve successfully logged into your TaxMingle account, you’ll arrive at the CPA Dashboard — your central hub for managing clients, documents, and tax workflows. To get started quickly and effectively, follow these essential first steps.
1. Set Up Your Profile
Click on the Settings tab in the sidebar and navigate to your Profile section. Here, you can:
Update your name
Edit your organization name and details
Set up security preferences such as two-factor authentication (2FA)
Completing your profile builds trust with clients and ensures smoother communication.
2. Invite Your First Client
To begin collaborating, go to the Invitations section from the sidebar. Click on Invite Client, then:
Enter the client’s name and email
Assign them to your organization or a specific folder (optional)
Send the invitation
Once accepted, clients can start uploading documents and responding to requests securely.
3. Upload Your First Document
Navigate to the Documents section and click Upload to add your first tax-related file. You can:
Create folders/subfolders for organization
Assign the document to a client or team member
Edit the file directly (PDF editing supported) or request a signature
This step sets up your workspace for an efficient document workflow.
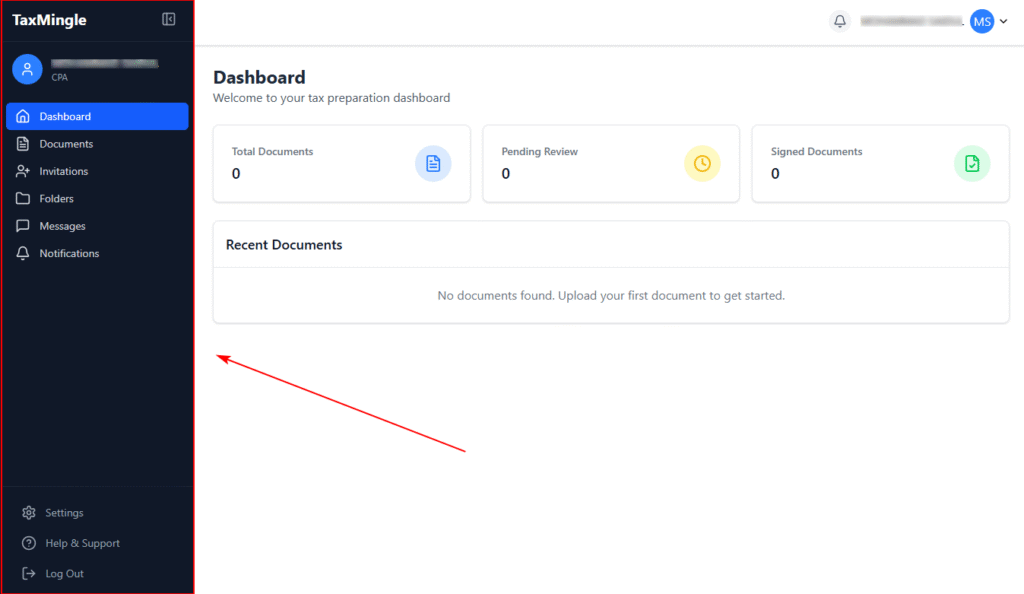
Once a CPA logs in to TaxMingle, they are welcomed into a clean, organized dashboard designed to simplify every part of the tax workflow. The dashboard is your central hub for managing documents, tracking client activity, sending invitations, and staying updated — all in one secure location.
Key Areas of the CPA Dashboard
The left-hand sidebar serves as your primary navigation tool, offering quick access to all essential features:
1. Sidebar Navigation
Dashboard – View a high-level summary of your workspace and recent activity.
Documents – Upload, manage, assign, and edit all tax files securely.
Invitations – Invite clients or teammates to join your organization.
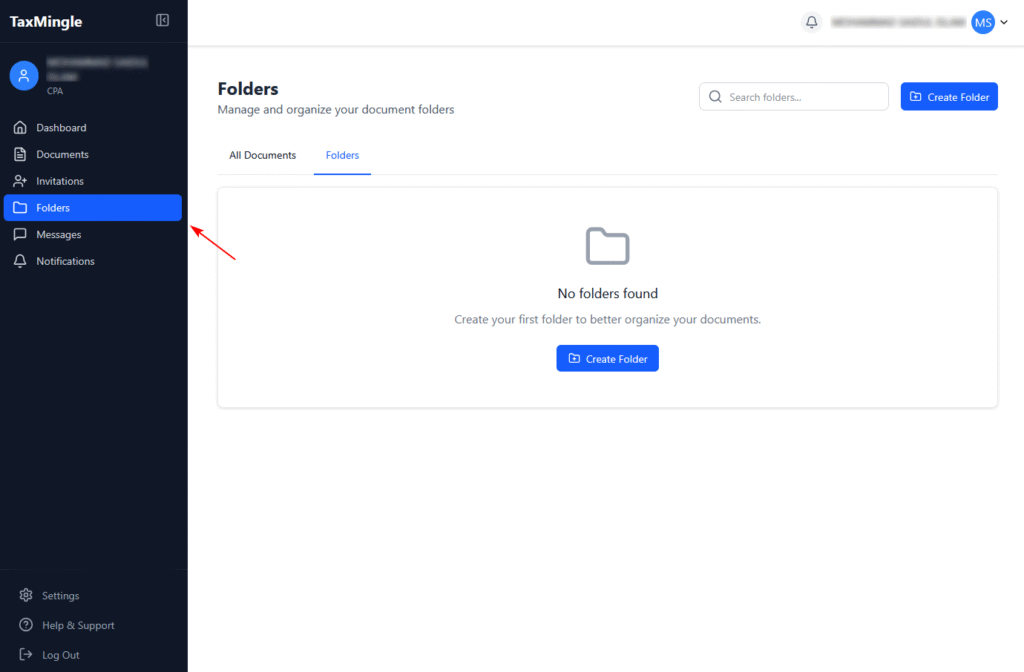
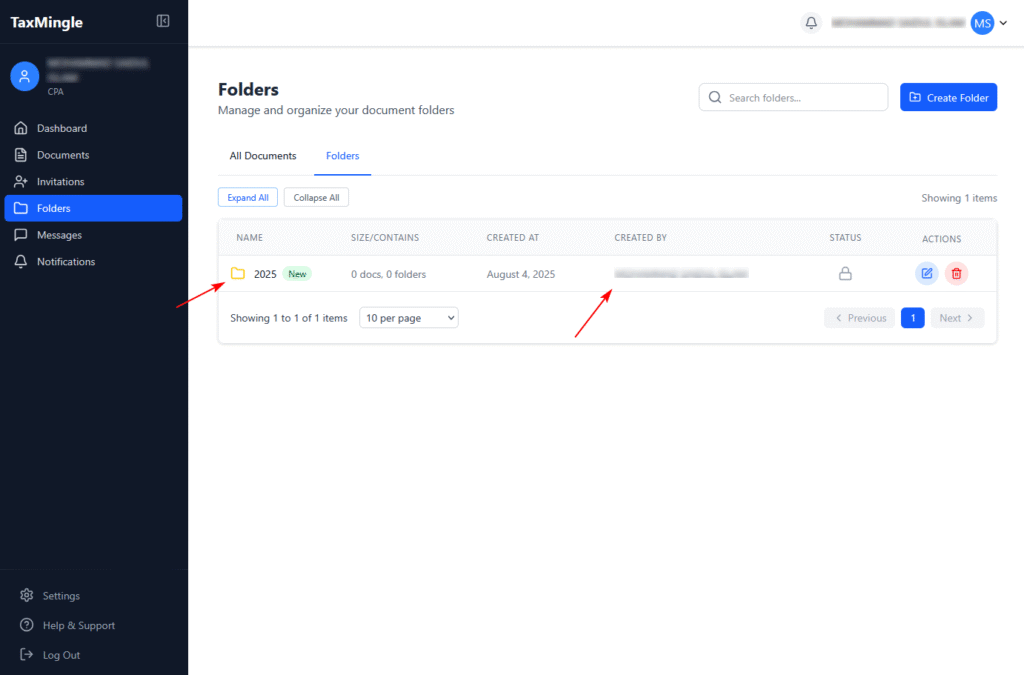
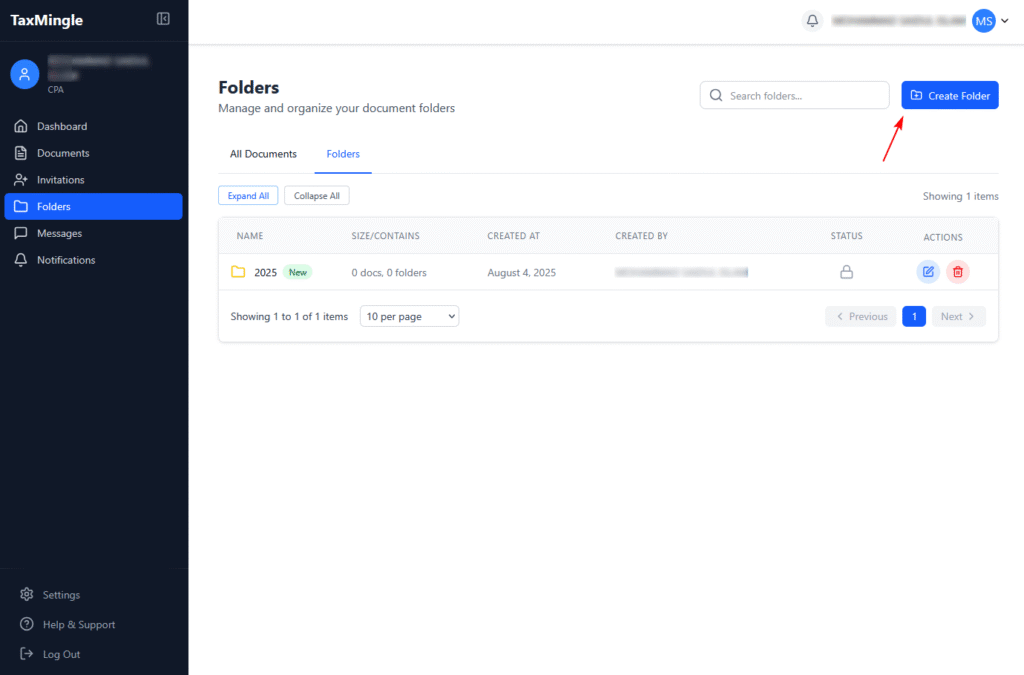
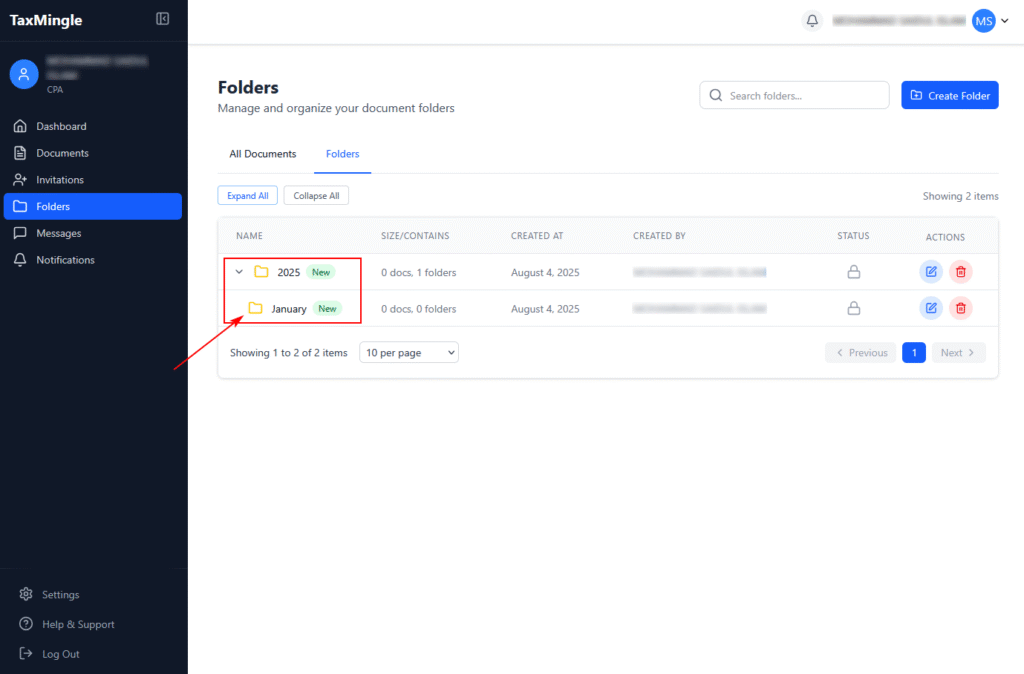
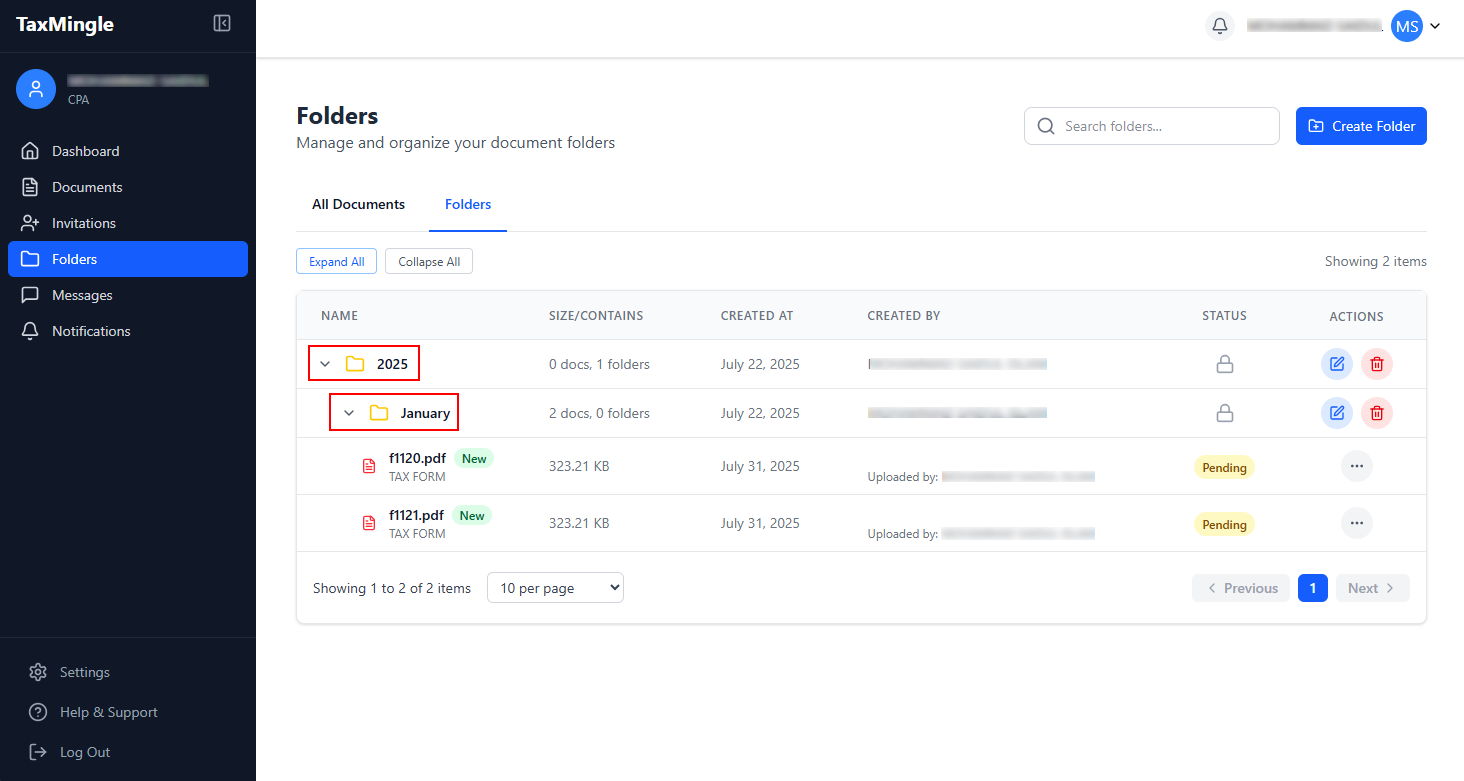
Folders – Organize documents by client, tax year, or form type for easy access and management.
Messages – Communicate instantly with clients using the built-in chat feature.
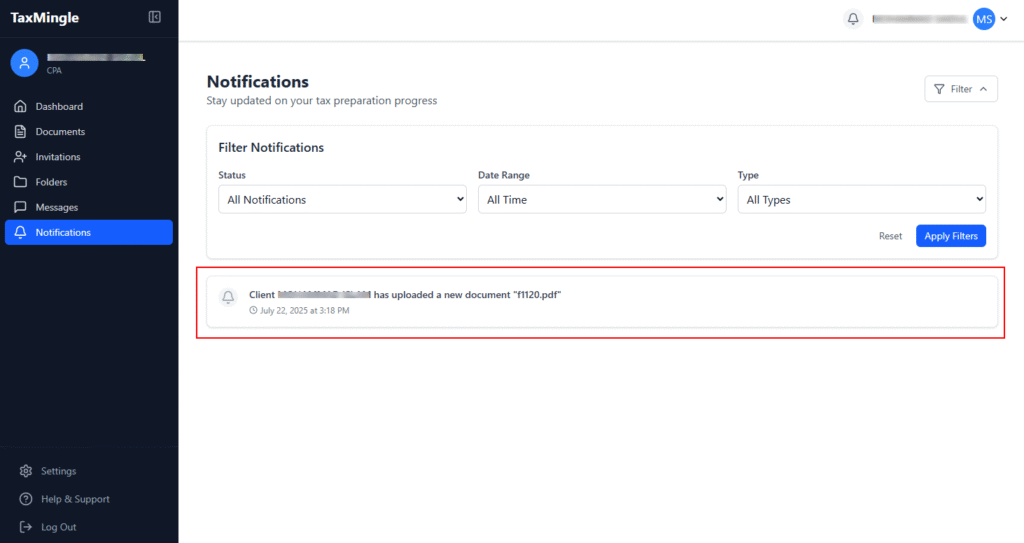
Notifications – Get real-time alerts for uploads, messages, signatures, and other updates.
Settings – Update your profile, manage your organization, and configure security preferences.
2. Main Workspace
The central workspace dynamically updates based on your sidebar selection. It displays the core content of each section, such as:
Folders and document lists
Upload options and file actions
Signature request tracking
Assigned client tasks or documents
This flexible layout ensures easy navigation and full visibility at all times.
3. Folder & Document Management
Organize your files with ease by creating folders and nested subfolders — sorted by client, tax year, or form type. From the document list, you can:
Assign documents to teammates or clients
Edit PDFs directly within the platform
Download, delete, or send documents for signature
Track actions and version status in one place
4. Real-Time Notifications
Stay updated with every important action. The notification panel alerts you instantly about:
New document uploads
Completed e-signatures
Incoming client messages
Invitation acceptances or rejections
You can also filter notifications by type, status, or date — keeping your workflow focused and efficient.
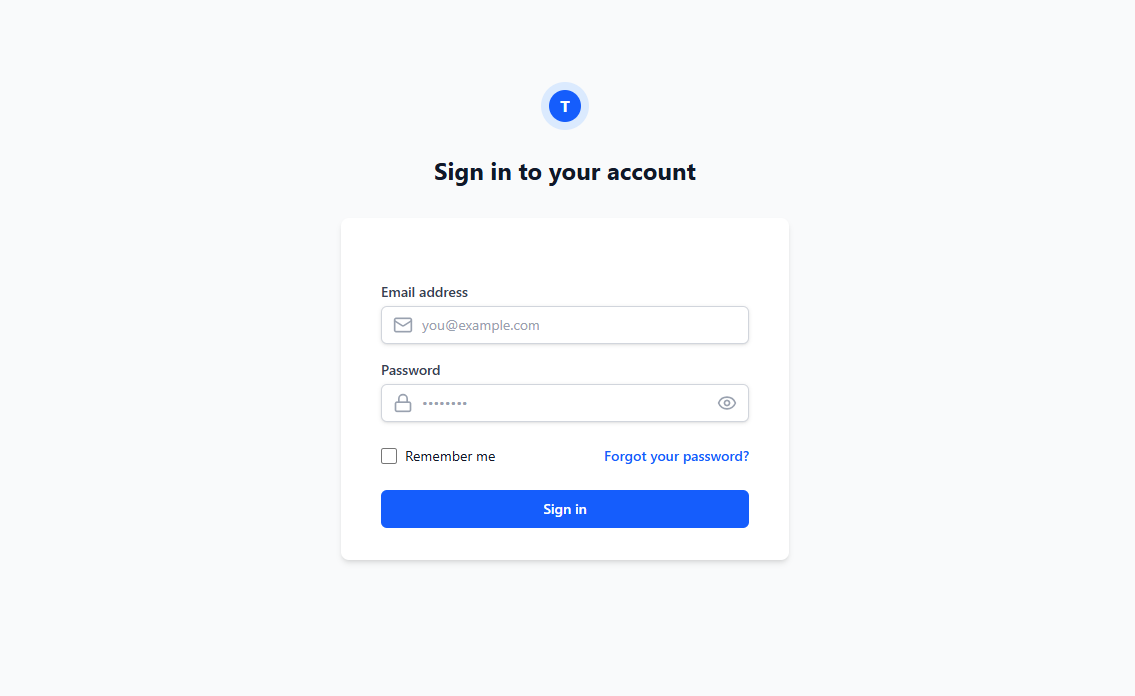
Logging in to your TaxMingle CPA account is quick and secure. Once your registration is complete, you’ll receive an email with a login link. Follow the steps below to access your dashboard and begin managing your tax documents and client collaborations.
Enter the email address and password you used during registration.
If Two-Factor Authentication (2FA) is enabled for your account, you’ll be prompted to enter the 6-digit verification code sent to your device.
Step 3: Click “Login”
After entering your credentials, click the Login button to access your CPA dashboard.
Forgot Password?
If you’ve forgotten your password, click the “Forgot password?” link on the login page. Enter your registered email address, and you’ll receive a link to reset your password securely.
Getting started with TaxMingle is fast, secure, and designed specifically for CPA firms and solo tax professionals. Follow this step-by-step guide to create your CPA account, select a pricing plan, and access your tax management dashboard in minutes.
Step 1: Start Registration by Contacting TaxMingle Support
To begin the CPA registration process, prospective users must first reach out to the TaxMingle team via email or support ticket. After reviewing the request and confirming eligibility, our team will respond with a secure registration link to complete the sign-up process.